Pages

Showing posts with label Cheesecake. Show all posts

Sunday, October 8, 2017

S'mores Cheesecake

Hi!

As I have stated in the earlier post, I have been experimenting a lot with cheesecakes. When is the best time to experiment? During celebrations of course! My girl Amal just joined the 26 y/o club a couple of weeks back.  As an adult, I really have trouble thinking of things to get my friends. Mind you most of them make more money than I do and can afford more things than me (I am still a poor student remember? :p) I always have and still believe that the best gifts are either 1)experiential or 2) homemade. So I chose the latter of course because with our busy schedules there are no way we could have gone anywhere adventurous.

Three years back, I made Amal an Oreo Cheesecake and this year I though long and hard about what flavours she may like. Chocolates! Making chocolate cakes/chocolate cheesecakes are too mainstream! So I decided to make S’mores Cheesecake instead because why not? There were only 5 of us I made a smaller version of the cake. I simply use 1/3 of the recipe and bake the cake in a 6" pan.


S'mores Cheesecake

3 sticks of cream cheese (750g), room temperature
3 eggs
2 tablespoon of all-purpose flour
1 cup sugar
¼ cup milk
a dash of vanilla essence
1 ¼  cup of finely crushed graham crackers
¼   to ½ cup of melted butter
½ of 165g Cadbury Chocolate Bar cut into chunks

Topping
½ of 165g Cadbury Chocolate Bar (melted)
Marshmallows
Digestive biscuit chunks
  1. Preheat oven to 325 degree Fahrenheit (300 degrees if using a dark non-stick spring form) the insides of a 9-inch spring form with parchment paper. Set aside
  2. In a bowl, mix the crushed graham crackers and melted butter together. Press firmly on the bottom and the sides of spring form.
  3. Bake for 10 minutes and set aside.
  4. In the meantime, mix the cream and sugar together using an electric mixer until well blended.
  5. Add in the flour and continue beating.
  6. Add in milk and vanilla essence and eggs and beat until combined.
  7. Using a spoon, mix in the chunks of chocolate bar into the batter.
  8. Pour the cream cheese batter onto the baked crust.
  9. Bake for 35 -45 minutes. The middle should still jiggle while the sides are slightly firm to touch.
  10. Let cool in the oven.
  11. Once cooled, let it set in the fridge for 3 hours minimum.
To decorate;
    1. Melt the remaining chocolate bar using the microwave of the double boiler method.
    2. Cover the top of the cheesecake with the melted chocolate.
    3. Burn the marshmallow using a blow torch or broil them under the broiler for a couple of seconds until it reaches your preferred burnt level.
    4. Arrange the burnt marshmallows and biscuit chunks on the cheesecake.


Birthday girl loves her cheesecake and I love her! Happy Birthday Amal!<3


Bon appetite!

Love,
Soffy

Thursday, October 5, 2017

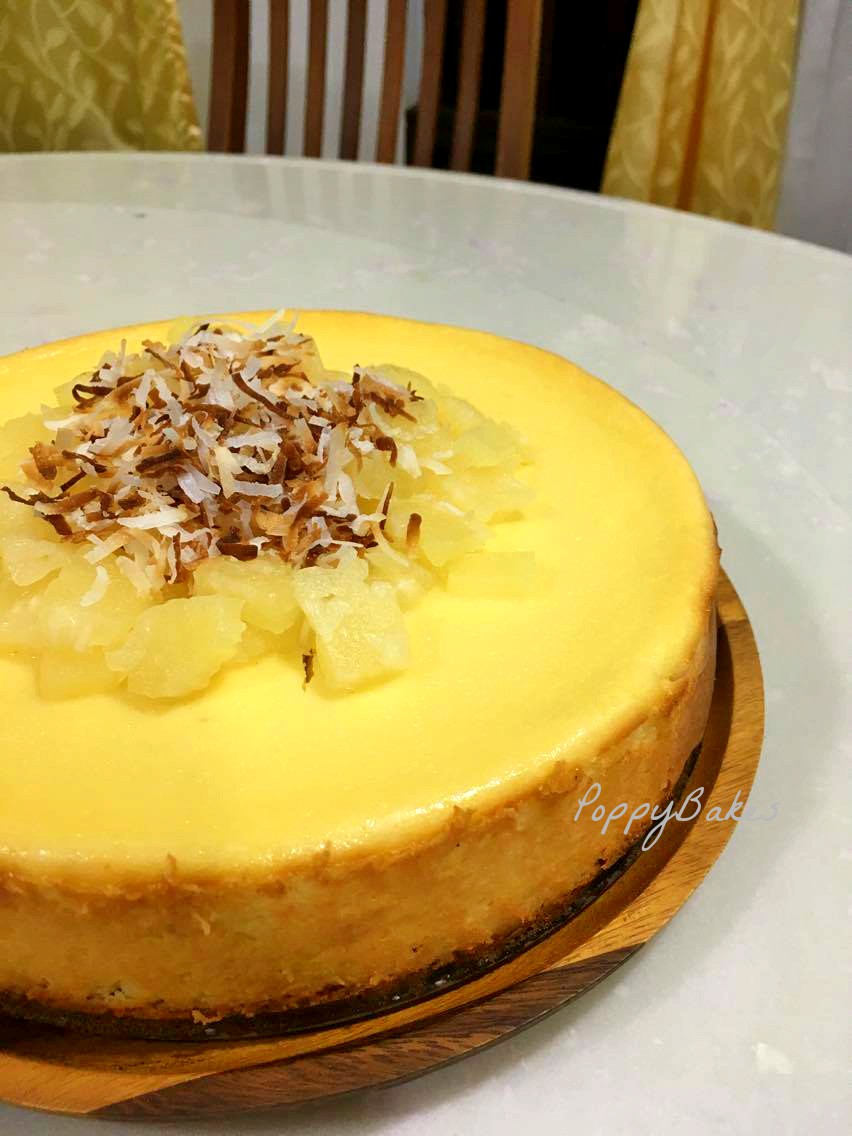
Piña Colada Cheesecake

Hi!

It was exactly a year ago since I last posted anything here! That is just crazy! Well, it was certainly a crazy decision to work full time while studying part time anyways. I work Mondays to

Saturdays(most Saturdays) and I have classes 2 or 3 times a week at night. Sundays are used to get my shit together i.e. laundry, make sure my husband still knows that I love him and also finish endless papers and assignments. How did I manage? A lot of crying for sure.

The thing about having so much stress yet having no time to release it was just crazy. I used to love spending my alone time in the kitchen (I still do) but there was just no time. Whenever I have free time, I sleep. It was like having a baby where I have to wake up in the middle of the night finishing off assignments/group projects that I did not have time to do during the day. 

I just quit my job last Thursday so I can finish off my remaining modules full time. Is that a good idea? I hope so. :)

As I am now a student again, I have a bit more time to spend in the kitchen. I have been brewing up a storm lately. Yesterday, I made something that I have ALWAYS wanted to bake. Piña Colada Cheesecake! My mom's and I favourite mocktail; Piña Colada (minus the rum obvs!). We are tropical girls after all! Who can resist the tanginess of pineapple mixed with the creaminess of coconut milk. Now imagine those flavours with cream cheese. It was a tropical paradise really! 


Piña Colada Cheesecake

3 sticks of cream cheese (750g), room temperature
3 eggs
2 tablespoon of all-purpose flour
1 cup sugar
3/4 cup coconut milk
1/2 can of crushed pineapple (from a 567g can), drained 
1 ¼  cup of finely crushed graham crackers
1/2 cup of melted butter
2 tablespoon of coconut oil


  1. Preheat oven to 325 degree Fahrenheit (300 degrees if using a dark nonstick spring form)
  2. Line the insides of a 9-inch spring form with parchment paper. Set aside
  3. In a bowl, mix the crushed graham crackers, melted butter and coconut oil together. Press firmly on the bottom and the sides of spring form.
  4. Bake for 10 minutes and set aside.
  5. In the meantime, mix the cream and sugar together using an electric mixer until well blended.
  6. Add in the flour and continue beating.
  7. Add in cocnut milk , crushed pineapple and eggs and beat until combined.
  8. Pour the cream cheese batter onto the baked crust.
  9. Bake for 35 -45 minutes. The middle should still jiggle while the sides are slightly firm to touch.
  10. Let cool in the oven. 
  11. Once cooled, let it set in the fridge for 3 hours minimum before cutting and serving.


(Optional) Serve with remaining crushed pineapple and roasted desiccated coconut.


It was so easy to make and it tasted DIVINE!


I will certainly update my other cheesecake experiments soon!

Bon Appétit!

Love,
Soffy

Friday, May 22, 2015

Chocolate Chip Cheesecake-Swirl Brownie

Assalamualaikum!


Let’s flashback to the time when I’m still not married and living with my mum. Her trusty old oven have baked so many things for me, I should feel bad that she/he wasn’t invited to my wedding! He/she deserved to be there. :(

My father is quite classic with his dessert choices. Chocolate isn't something that he is too fond of. Not that he doesn't like it, but if there is a list of desserts, chocolate wouldn't be his first choice. I was making a Chocolate Chip Cheesecake-Swirl Brownie for my sister a couple of months back and was surprised that my father really..i mean...REALLY enjoyed it. I wouldn't blame him. It was delicious! Very decadent and indulgent. It makes all your worries go away. I kid, of course. But wouldn't it be better to be munching on these babies when you're stressed out than just being plain stressed out with no chocolate treat in your hands?

I also had a small "class/tutorial" with the cousins showing them how easy and fool proof this recipe is..

Original recipe here.
Chocolate Chip Cheesecake- Swirl Brownie
For the Brownie Mixture:
½ cup butter (melted)*

1¼ cup granulated sugar
¾ cup unsweetened cocoa powder
¼ teaspoon salt*
 1 teaspoon vanilla extract
 2 large eggs
½ cup all-purpose flour
 ¾ cup chocolate chips /chocolate chunks

For the Cheesecake Swirl:
 8 ounces cream cheese, softened
 ¼ cup granulated sugar
 ¼ teaspoon vanilla extract
1 large egg

* If using salted/ semi salted butter, omit the salt.

  1.  Preheat oven to 350 degree Fahrenheit or 180 Celcius. Line an 8 x 8 inch pan with parchment paper. Set aside.
  2. In a large mixing bowl, combine the sugar, salt* and cocoa powder. Add the melted butter and the vanilla extract, mix until well combined.
  3. Add the eggs, one at a time, stirring vigorously after each one. 
  4. Add the flour and mix until it’s well incorporated.
  5. Fold the chocolate chips into the batter. Set aside.
  6. In a separate bowl, using an electric mixer, mix together all of the ingredients for the cheesecake swirl. Set aside.
  7. Pour 2/3 of the brownie batter into the prepared pan. Then, slowly pour the cheesecake swirl batter on to the brownie batter.
  8. Take the remaining brownie batter and dollop the batter randomly on the cheesecake swirl batter in the pan.
  9. Using a toothpick, slowly swirl the mix of the batters around to create a marble effect.
  10. Bake for 15-20 minutes or until the brownie is set.
  11. Let it cool and serve.


I know this is not the best picture...but this is the ONLY decent picture I could find and that says a lot! It is a brownie with cheesecake bits in it. What else could you ask for in a dessert/mid-night snack right? Super easy to make and super impressive at potlucks and get togethers. Give it a shot for your next gathering! Can you imagine what it'll be like if you use butterscotch chips instead?!

P/s: I am currently a housewife. I need housewife friends and we could all move to New Jersey. Or perhaps we could still stay in KL and be desperate instead? Desperate KL Housewives. Yep. Sounds like the next big reality show alrite!


Till then.

Love,
Sofhan Hasni 

Monday, April 27, 2015

Mango and Kiwi Cheese Tart


Assalamualaikum


For my wedding last November, my lovely colleagues gave me an amazing microwave oven. This baby can grill, bake, heat up food....you name it. THANK YOU GUYS! Since then, they kept on pestering me to bring baked goods to the office. AS IF I HAVE SO MUCH TIME TO BAKE! Leaving the apartment at 7.30 am in the morning and coming back home nearing 7 pm with a pile of laundry to sort, dinner to be cooked and well..trying not to pass out of exhaustion. When will I have the time to bake?!

It's quite tricky for me to adjust myself with this oven. I usually use the oven that is connected to a stove top and they work wonderfully. Since this oven is smaller and full on fancy schmancy,  I need to amend the baking time as well as the temperature for most of the recipes that I swore by. Oh well. Nothing is easy in life!

I've been wanting to try a mango tart/pie for almost two years, I think. But Mangoes are EXPENSIVE in Canada! Why buy mangoes when you can get berries there, right? In Malaysia mangoes are easy to find and quite reasonably priced. Especially if you go to the markets or even Money Back Guaranteed (MBG) Stores and you get to try em. Yeay! When I was in MBG, kiwis were on sale, hence the mango AND kiwi cheese tart.

Why Cheese filling instead of the usual custard filling? First off, hello? It's cream cheese! This shouldn't even be a question in the first place. Second, if you get the right and ripe mangoes, they are VERY SWEET. Pairing it with custard would make it tooooo creamy and sweet. However, by using cream cheese, you can reduce the amount of sugar in the recipe accordingly and let the tartness of the  cream cheese shine. (GOD! The way I write is very MKR-ish!). The tartness of the cream cheese will balance out the sweetness of the fruits.

Funny story. I made a Mango Tart for my officemates. It was cray cray! Trying to bring a tart in a CRAMPED LRT, what was I thinking?! Once I reached the office,  I sighed with relief. This was about less than 5 minutes before I accidentally dropped the tart on the floor.  I DIED! My friends thankfully are as crazy as I am. They ate it anyways! Obviously I feel bad and made another one on the next day. :p


Mango and Kiwi Cheese Tart

3/4 cup (185g) creamcheese, room temperature
3/4 cup  (170ml) whipping cream
1/3 cup sugar
1-2 ripe Water Lily mangoes
2 ripe kiwis
1 cup digestive biscuit crumbs / 250g biscuits
1/2 cup (125g) melted butter
  1. Preheat the oven to 180 degree Fahrenheit.
  2. In a bowl, mix together the biscuit crumbs with the melted butter. Press the mixture onto a 9-inch tart pan. (If you feel that your crumbs are a tad too dry, add more melted butter)
  3. Put the crust in the oven and bake for 15-20 minutes. Let cool slightly.
  4. Beat your creamcheese with sugar until light and fluffy. In a different bowl, whip your whipping cream until it reaches medium to hard peak. 
  5. Fold the whipping cream into the creamcheese mixture.
  6. Once your crust has slightly cooled, pour the creamcheese mixture onto the crust.
  7. Peel your fruits and slice them thinly.
  8. Arrange your sliced fruits to your liking.
  9. Serve immediately 


This tart can be made ahead of time. Just slice and arrange your fruits right before you serve to avoid the fruits from drying or going bad!

It is not that easy to find digestive biscuits near my area. Because I ran out of digestive biscuits, I had to mix some Tiger Biscuits in my crust. Tiger biscuits, for the love of God, do not absorb melted butter well. So I ended up using more butter than usual. The crust tasted fine, thank God!Phew... and I didn't dropped it this time. :)


Till then.

Love,
Sofhan Hasni

Wednesday, August 20, 2014

Lemon Cheesecake

Assalamualaikum!

When I am at home, I have to keep my desserts simple because my mom would eat them after lunch and dinner, while my dad would savour them during the night when he is focusing on his work. My parents grew up with kuih lapis, kasui and akok so fancy and hard-to-pronounce desserts have to wait.However, one thing for sure is that my parents LOVE cheesecakes. LOVE LOVE LOVE them. Don't we all? So I made lemon cheesecake the other day…and it tasted heavenly! I am the kind of person who would stick to a recipe that I love, but I’ll certainly modify it to my liking! I used my Classic New York Cheesecake Recipe (here) and then add some lemon elements here and there to make this lovely lemon goodness. 

I love lemon cheesecake! Cheesecakes are of course rich and indulgent but having a hint of citrus definitely brings the creaminess down a couple notches. I've always seen a lot of cheesecakes with high crusts…meh..why not give it a shot?


Lemon Cheesecake

1 ¼  cup of finely crushed graham crackers** (2 ½ ±cup for high crust)
¼   cup of melted butter** (1/2 ±cup for high crust)
1 cup sugar
1 kg of cream cheese (4 packages)
½  cup sour cream
½ lemon juice 
3 tablespoon of lemon rind (About 2-3 lemons)
1 tablespoon vanilla
4 eggs

  1. Preheat oven to 325 degree Fahrenheit (300 degrees if using a dark nonstick spring form)
  2. Spray the insides of a 9-inch springform. Set aside
  3. In a bowl, mix the crushed graham crackers and melted butter together. Press firmly on the bottom and the sides of spring form.
  4. Bake for 10 minutes and set aside.
  5. Using an electric mixer, beat the cream cheese and sugar together until well combined.
  6. Add in the sour cream, lemon rind, lemon juice and vanilla, continue mixing.
  7. Add in the eggs into the mixture. One at a time.
  8. Pour the mixture on to the baked crust and bake for 50 minutes to 1 hour.
  9. Turn off the oven and let the cheesecake rest in the oven for another hour with the oven door slightly ajar.
  10. Refrigerate for a couple of hours.


Tips:
  1. This cheesecake would not be fully set. The sides would be firmer but the middle part would still be slightly jiggly. It will fully set once you put it in the fridge.So once the sides starts to firm up turn off the heat.
  2. The reason why you don't take the cheesecake out straight away is to avoid the cheescake from cracking. There would be instances where it will crack, but then again..you could always cover it with candied lemons or lemon curd.
  3. When making a high crusted cheesecake, keep in mind that sometimes you may need more graham crackers and butter. Don’t be scared to add more butter if the crust seems a bit dry. Make sure you have extra on the side!To be honest, I rarely follow the measurements to make the crust..some people like a lot of it some don't. So adjust the thickness and amount of crust to your liking. 
  4. Mix the ingredenits for the sake of mixing. DON'T OVER MIX the batter. Like other kinds of cakes, there are serious concequences to overbeating the batter. CHeesecakes are not meant to rise! Overbeating the batter would trap too much air in the cheesecake. Thus, causing the cheesecake to overflow when you bake it as the trapped air make its way out.SO once the ingredients are well blended.Stop.
  5. Be creative. Compare this recipe with my Classic New York Cheesecake recipe. Not much difference really.So don't be scared to modify a recipe. Add some blueberries to make a blueberry cheesecake blueberry lemon cheesecake. Swirl in some Nutella, strawberry puree..Go crazy!


I should make some coffee cheesecake for mommy soon. I know she’ll love it.She is definitely blaming me for any weight gain and I should blame her as well….thanks ma for the rendang, laksa, singgang dan lain-lain.*sigh*

Till then, Wasalam.

Love,
Sofhan Hasni

Friday, August 15, 2014

Brûléed Cheesecake

Assalamualaikum.

The day before I left Montréal for good, the girls and I had our last lunch together at Lola Rosa on Milton. I ordered this scrumptious Ginger and Basil Crème Brûlée and DIED. Went to dessert heaven and came back. While I was enjoying my dessert, my friend was us telling about the Crème Brûlée cheesecake that her colleague made for her. What? Wait What? Crème Brûlée? Cheesecake? Creme Brûlée Cheesecake? WHAT?!!!!!!How in the world did I not know about its existence?! WHAT?!

Anyways, I did some research…turns out..Creme Brûlée Cheesecake is a brûléed cheesecake (I could be completely wrong but after looking at a couple of recipes, this was what I concluded). Basically you bake a cheesecake of any kind and let the baby cool. Once your delicious cheesecake has cooled, sprinkle some sugar on it and broil it under the broiler for a couple of minutes or use a blow torch to melt the sugar into a layer of sugar wonderland on your cheesecake. Serve immediately to have that “crunchy” effect.

Mind you it takes a split second for the sugar to burn. So broil the cheesecake in 350 degree celcius for only a couple of minutes (2-4 minutes).

Here I used my trusted New York Cheesecake recipe.


Hamna,hamna…come to mama…


Till then, Wasalam.
Love,
Sofhan Hasni

Saturday, August 9, 2014

Failed Experiment: Maltsers Tofu Cheesecake

Assalamualaikum!

I recently moved back in with my parents back in Malaysia. Although I do get to eat mom’s delicious cooking, I have to adapt to having two little munchkins tugging on my hair and feet while I work on my laptop or making phone calls while one of the munchkins are wailing in the background. I am having my fair share of practicing with nappy changes and putting the little ones to sleep for God knows when. *breathe* I have a couple of months break before I start working in October. *breathe* Just after I type this a little boy comes to my side with a balloon wanting to play. This morning my little nephew tugs on my hair with anger after I wiped his booger. That is AFTER he wiped his nose on my hair. Oh the glamorous life of an auntie.

I still take time now and then to put my music on in the kitchen while I try different things. One of the things that I have been DYING to try making is the Tofu Cheesecake. Tofu is cheap here…so why not? As I was browsing through some recipes I stumbled upon a Maltsers cheesecake. Again why not?So I decided to combine both recipes and make Maltsers Tofu Cheesecake. The verdict? I don’t think it is one of my decisions that I have ever made.

It’s not a surprise that it is not as creamy as normal cheesecakes and there is indeed a hint taste of tofu, which I don’t really mind. The texture however is silky just like other no bake cheesecakes. Personally I think a tofu cheesecake is better if it is fruit or chocolate flavored. Some of you might ask errmmm why TOFU?! By using tofu you cut down the calories. You use half the cream cheese that you would usually use. So, personally if you really love cheesecakes and you don’t want to feel guilty about eating it, make a chocolate version, or fruit version.

If you were wondering… only my mum had the guts to try this cheesecake. My brother, brother in law, sister and father did not even TRY…


Why do I call this a failed experiment? I put cut up pieces of Maltsers in my cheesecake thinking that it would taste divine (I LOVE MALTSERS),but I was clearly wrong. The thing about cut Maltsers is that the malt on
the inside melts but not the chocolate coating; leaving weird hollowed half chocolate balls throughout the cheesecake. EEKK! Another thing about making Maltsers cheesecakes is that you add a little bit of malt powder…and that also did not turn out well…


So I don’t think it’s the tofu that needs to be chucked out the window. I think it’s the Maltsers..or the combination of both. I would certainly try a different version of a tofu cheesecake in the future…but Malstsers…ergh..

If it’s not too late, may I wish you Selamat Hari Raya, Maaf Zahir dan Batin.

Till then,Wasalam.
Love,

Sofhan Hasni

Thursday, March 6, 2014

Blueberry Cheese Tarts

Assalamualaikum!

I haven’t blogged in awhile.phew, being in your last year of uni is no fun! Fall semester came and went, and now hopefully, my last semester. I want to enjoy being a student while I still can... J

I just got back from a quick getaway to Quebec City. I freaking love that quaint little town. The architecture, the food, the view..It would've been lovelier if it wasn't snowing and my hands and feet weren't frozen!! We strolled through the Lower side of Old Quebec City; we went to the Ice Hotel, and also the Montmorency Falls. It was frozen. So I can finally tell people that I've seen a frozen waterfall. It was still so Magnificent!  Being such aunties that we are, we wouldn't leave that city without stopping at J.A Moisan. It is the oldest grocery store in North America. Boy, I wish I could just live there, right in the tea cookie section. It was BEAUTIFUL! I died and went to food heaven. I had to stop myself from getting more things that I don’t need. I convinced myself that I need these babies. I can just imagine them in my future kitchen. In between the big red porcelain cookie jar and my sexy red Kitchen Aid mixer. Hah! Okay the imagining part was a lie. But really...I know I would soooo regret not buying them. So I did. Now everyone knows where all my money went. =)


 Anyways, let’s start talking about desserts shall we? Whenever my older siblings went to their orthodontics appointments when we were younger, I always LONGED for the blueberry cheese tarts that were sold in a bakery near our orthodontists’. It was and still is a favorite of mine.It’s funny how I don’t think I like nor would I bake a blueberry cheesecakes, but for some reasons, I simply adore these tarts. Maybe it's the size? It’s one of my mum’s favorite too. So I can’t wait to make her some once I head back home. (Hi mom!)

Blueberry Cheese Tarts
20 Tart shells
1 cup(250g) of cream cheese (room temperature)
1 cup(250ml) of whipped cream
½ cup of sugar
about ¼ cup of blueberry jam
Food coloring (optional)
  1. Preheat the oven to 350 degree Fahrenheit and blind bake the shells for 15 minutes or until the crust turns golden brown. Set aside
  2. In a big bowl, using an electric mixer, combine the cream cheese and sugar until well incorporated.
  3. In another bowl, whip the cream until the peaks are firm.
  4. Slowly mix the whipped cream and cream cheese mixture together.Set aside.
  5. Scoop about a half tablespoon of blueberry jam into the cooked tart shells. Then, dollop some of the cream cheese mixture onto the jam layer. Even the top of the cheese tarts using the back of a spoon or butter knife.
  6. To create any designs, take some of the cream cheese mixture and add some food coloring in a separate bowl.
  7. Using tooth picks or bamboo skewers, slowly create your designs on each of the cheese tarts.
  8. Refrigerate for an hour or more to let the cheese tarts firm up.


You can definitely substitute the blueberry jam for strawberry jam or marmalade even. This recipe is incredibly easy. If you are serving this at an event,everything can be made earlier on and assembled on the day of. As usual I am not even ashamed of admitting that I used a store bought tart shells. I bought these shells in Provigo. Those are one of the things that I wouldn't waste my time on.  Please.. the extra hour or two to make those tart shells can be spent...well..napping =P


It's already Wednesday!Half of our reading week came and went, the amount of things need to be done is still a mountain high. Lord give us strength!Amin.

Wasalam.

Till then,
Love,
Sofhan Hasni

Saturday, August 31, 2013

Toblerone Cheesecake

Assalamualaikum!

When I was at my parents place, I had plenty of time to type down new recipes that I’ve tried and experimented on. However, there was always this little assistant of ours who was constantly amazed and forever captivated by any sorts of gadgets…Lo and behold, meet Ngum ngumm...my sweetheart andd...my heart breaker..

Kids these days..

We had a few ginormous bars of Toblerone in our fridge that my BIL 1.0 brought from Perth. I asked my sister if she wanted a Toblerone Cheesecake and of course… who would ever resist such decadent chocolate dessert? I can’t remember who came up with the idea first. Us sisters gossip about food almost constantly! Our whatsapp group is filled with either food or ngum ngumms photos. No surprises there...

This Toblerone Cheesecake is one of the easiest cheesecakes I've ever made. It’s a no-bake cheesecake and no gelatin/agar is required. I decided to use Tiger biscuits which are energy biscuits sold in South East Asian countries. The amount required was a lot more than I had on hand so I decided to use some Coconut biscuits as well. It was SPOT ON! I wished I have used only coconut biscuits instead of them together. The coconut flavor balances the strong chocolatey taste really well. It gives an extra tropical kick that was simply lovely in your mouth.

I made this right before we left for my farewell dinner. I was scrambling and rushing to get things done. Instead of crushing the biscuits using the Ziploc-and-rolling pin method or using a food processor, I decided to crumble the biscuits using my hands. The biscuits weren't finely crumbed and there were still a whole lot of big chunky pieces. Again, surprisingly, it worked really well. I really like the crunchiness that it gives in every bite. If you like silky smooth desserts, then I’d suggest you use the food processors and processes those biscuits to sand like texture instead. But really, you should give the crunchy crust a try! One thing that I don't miss is sweaty cakes.Oh boy...

Original Recipe here

Toblerone Cheesecake

1 ¼ cup biscuit crumbs
80g butter, melted
500g Cream Cheese
1/2 cup sugar
300g Toblerone, melted
1/2 cup whipping cream


  1. Line an 8-inch round cake pan with parchment paper, set aside.
  2. In a bowl, combine melted butter and breadcrumbs Press the mixture firmly into the cake pan. Set aside.
  3. Using an electric mixer, beat the cream cheese and sugar until well combined. Set aside.
  4. In a different bowl, whip the whipping cream until soft peaks form.
  5. Fold the whipping cream into the cream cheese batter.
  6. Add in the melted Toblerone and mix well.
  7. Pour the cream cheese batter into the cake pan. Refrigerate 2-3 hours or overnight until set.


This was our farewell dessert dish that I didn’t get to enjoy it with my sister. She was working on the day that I left. So I had to enjoy it without her and her without me. Bummer! I barely finished my slice before we left for the airport, so today, I’m planning to make another one with a different crust.Wooot woot!


A few more days till school reopens. Final year. MAJOR YIKES!

Happy Independence Day Malaysia!

Wasalam.

Till then,
Love,
Sofhan Hasni