Pages

Showing posts with label Food. Show all posts

Sunday, April 29, 2018

Kunafe/ Kunafa


Hello there!

As usual, my life is crazy busy juggling work and my studies at the same time. I have no idea how I managed it for the whole year last year, so I’m pushing myself a lot harder for this year as well. I have very few resolutions for this year. First  is to cook more and second is to try cooking other cuisines as well. So here is one of my experiments for this year.

I remember falling in love with Kunafe/Kunafa during Frosh around 8 years ago (oh my god, it was that long ago!). I remember being so intrigued with this sweet yet salty dessert. Shreddded pastry that encases melted cheese and sweetend with orange blossom syrup. Oh wow, oh wow. Since then I have been dreaming to try my hands at it, but never did. I mean, come on, Al- Baghdadi, a Middle-Eastern Bakery was so close to our university. I could just get the Metro and get my cravings fixed. My bestfriend’s mom was also kind enough to share her recipe with us. There we were three girls following her around her kitchen and observing how this dessert was made. She was an amazing cook! I still miss her food to this day. J

Since I moved back to Malaysia, I have not had Kunafe/Kunafa since. Until mom told me that the restaurant near our house had it. I was so excited, but was a tad bit disappointed. I learned that there are different kinds of kunafe/kunafa, and the version that they serve at the restaurant was the creamy (no cheese) one. I was determined to make one myself, the way I like it! I was googling for good recipe to follow and as usual, traditional recipe as such has different variation. I was quite upset to see recipes that require a “kunafe pan”, “ a big pan”, “ a wide pan”. I mean hello? How big is big? How wide? Are the measurements using the metric system? Anyways, I stumbled upon this recipe here: Kunafa Nabulsi . The recipe is straight forward and so easy to follow. Since I did not have a 10 inch pan, I used an 8 inch instead. I have tweaked the recipe a bit, to my liking.


Kunafe/Kunafa

1 tablespoon butter, melted (for oiling the pan)
1/4 teaspoon orange liquid food coloring
1/2 cup melted butter
400 grams of shredded filo dough (kataifi), thawed
1 cup (250g) of ricotta cheese
1 ½   cups  of mozzarella cheese
1 tablespoon of sugar
1 tablespoon of orange blossom water
Pistachios for garnishing (Optional)


For the syrup
1  cup of sugar
3/4 cup water
1 teaspoon lemon juice
1/2 teaspoon orange blossom water


1.     Preheat oven to 180 Celsius.
2.     Butter your 8 inch cake pan. Add a few drops of colouring  and spread evenly on the bottom  and sides of the pan. Add some more colouring if needed. Set aside.
3.     In a big bowl, combine the cheeses, sugar and orange blossom water together. Set aside.
4.     In a different bowl, mix together the shredded pastry and melted butter.
5.     Place  and press half of the shredded pastry into the cake pan.
6.     Add the cheese mixture on the flattened shredded pastry.
7.     Cover the cheese mixture with the remaining shredded pastry.
8.     Bake for about 30-35 minutes or until slightly brown. Let rest for a couple of minutes before inverting it.

Sugar Syrup
  1. On a medium heat, combine the water, sugar and lemon juice in a saucepan.
  2. Simmer for about 5 minutes or until the sugar dissolves.
  3. Turn off heat and add the orange blossom water.
  4. Let cool slightly. Drizzle on kunafe/kunafa.


Note.
The Syrup can be a tad bit sweet so you can put a minimal amount of syrup on top just to coat the pastry and serve the extra syrup on the side.

As you can see, I DID NOT spread the colouring evenly! :p Oh well, first try! Nonetheless, it was a glorious glorious dessert.  My mom still preferred that creamy Kunafe/Kunafa served at the Middle-Eastern restaurant over mine. *eye roll* To each their own, I guess. K mom, k.


Till next time,
Soffy 

Thursday, October 5, 2017

Piña Colada Cheesecake

Hi!

It was exactly a year ago since I last posted anything here! That is just crazy! Well, it was certainly a crazy decision to work full time while studying part time anyways. I work Mondays to

Saturdays(most Saturdays) and I have classes 2 or 3 times a week at night. Sundays are used to get my shit together i.e. laundry, make sure my husband still knows that I love him and also finish endless papers and assignments. How did I manage? A lot of crying for sure.

The thing about having so much stress yet having no time to release it was just crazy. I used to love spending my alone time in the kitchen (I still do) but there was just no time. Whenever I have free time, I sleep. It was like having a baby where I have to wake up in the middle of the night finishing off assignments/group projects that I did not have time to do during the day. 

I just quit my job last Thursday so I can finish off my remaining modules full time. Is that a good idea? I hope so. :)

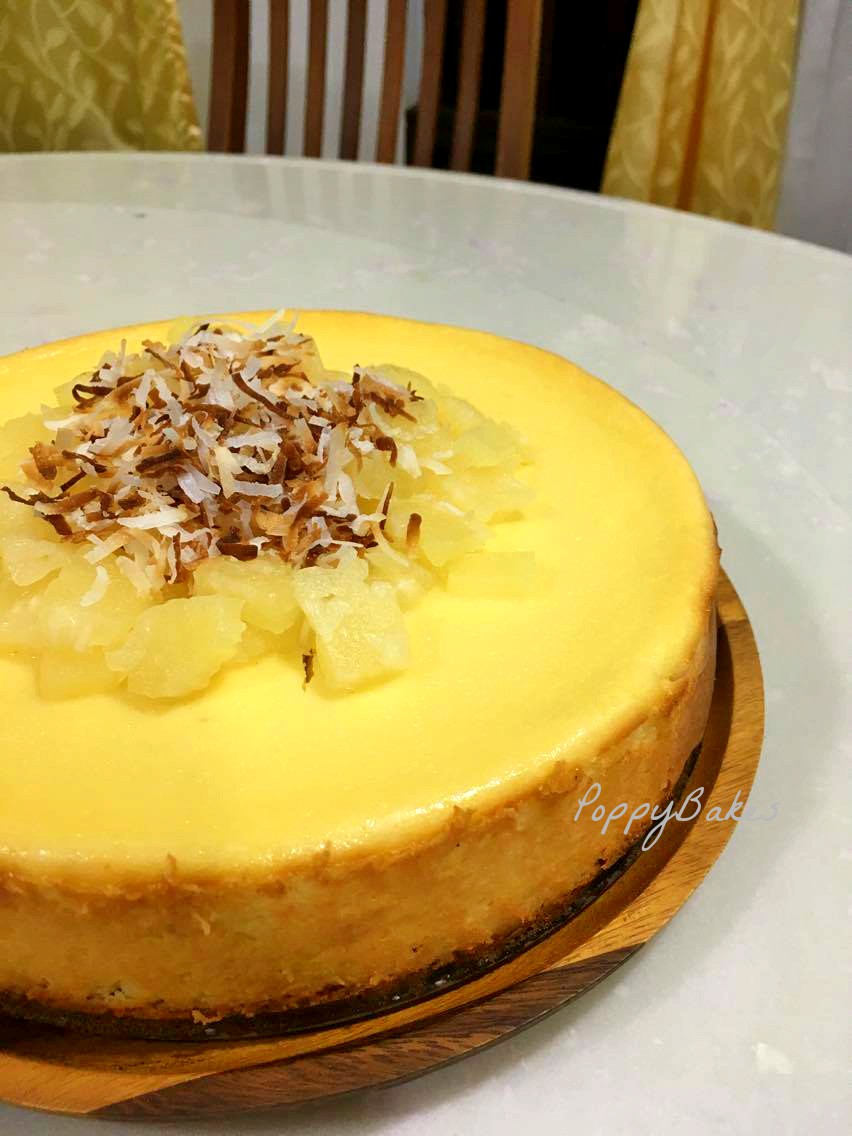
As I am now a student again, I have a bit more time to spend in the kitchen. I have been brewing up a storm lately. Yesterday, I made something that I have ALWAYS wanted to bake. Piña Colada Cheesecake! My mom's and I favourite mocktail; Piña Colada (minus the rum obvs!). We are tropical girls after all! Who can resist the tanginess of pineapple mixed with the creaminess of coconut milk. Now imagine those flavours with cream cheese. It was a tropical paradise really! 


Piña Colada Cheesecake

3 sticks of cream cheese (750g), room temperature
3 eggs
2 tablespoon of all-purpose flour
1 cup sugar
3/4 cup coconut milk
1/2 can of crushed pineapple (from a 567g can), drained 
1 ¼  cup of finely crushed graham crackers
1/2 cup of melted butter
2 tablespoon of coconut oil


  1. Preheat oven to 325 degree Fahrenheit (300 degrees if using a dark nonstick spring form)
  2. Line the insides of a 9-inch spring form with parchment paper. Set aside
  3. In a bowl, mix the crushed graham crackers, melted butter and coconut oil together. Press firmly on the bottom and the sides of spring form.
  4. Bake for 10 minutes and set aside.
  5. In the meantime, mix the cream and sugar together using an electric mixer until well blended.
  6. Add in the flour and continue beating.
  7. Add in cocnut milk , crushed pineapple and eggs and beat until combined.
  8. Pour the cream cheese batter onto the baked crust.
  9. Bake for 35 -45 minutes. The middle should still jiggle while the sides are slightly firm to touch.
  10. Let cool in the oven. 
  11. Once cooled, let it set in the fridge for 3 hours minimum before cutting and serving.


(Optional) Serve with remaining crushed pineapple and roasted desiccated coconut.


It was so easy to make and it tasted DIVINE!


I will certainly update my other cheesecake experiments soon!

Bon Appétit!

Love,
Soffy

Monday, September 19, 2016

Easy New York Cheesecake

Hello!

My family loves cheesecakes. Like. We WOULD DIE FOR cheesecakes! Cheesecakes make the world go round. One of the best things about cheesecakes is how versatile and how creative you can play around with the recipe. New York cheesecake is the new white canvas! I do not like the no-bake cheesecakes. Yes, you do not need to heat up your oven and you can dig in a lot faster, but I really dislike the texture and the taste of it is different from a baked cheesecake. I find that baked cheesecakes are more decadent and less well, muak-y. Sorry can’t find any English word for ‘muak’.

My sister recently shared her newly-found cheesecake holy grail. It is so easy and it uses only a couple of ingredients that it’ll take you only a couple of minutes to whip this bad boy up. *whip!whip!


Easy New York Cheesecake

3 sticks of cream cheese (750g), room temperature
3 eggs
2 tablespoon of all-purpose flour
1 cup sugar
¼ cup milk
a dash of vanilla essence
1 ¼  cup of finely crushed graham crackers
¼   to ½ cup of melted butter

  1. Preheat oven to 325 degree Fahrenheit (300 degrees if using a dark nonstick spring form)
  2. Line the insides of a 9-inch spring form with parchment paper. Set aside
  3. In a bowl, mix the crushed graham crackers and melted butter together. Press firmly on the bottom and the sides of spring form.
  4. Bake for 10 minutes and set aside.
  5. In the meantime, mix the cream and sugar together using an electric mixer until well blended.
  6. Add in the flour and continue beating.
  7. Add in milk and vanilla essence and eggs and beat until combined.
  8. Pour the cream cheese batter onto the baked crust.
  9. Bake for 35 -45 minutes. The middle should still jiggle while the sides are slightly firm to touch.
  10. Let cool in the oven. 
  11. Once cooled, let it set in the fridge for 3 hours minimum before cutting and serving.


I recently made a small one recently using a 6" pan by halving the recipe. I find that baked goods are the best birthday gifts. The top browned quite a bit!Yikes. Using a sharp knife I simply carved the caramelised areas and carved some chocolate curls. I used a Cadbury Milk Chocolate Bar. The trick is to keep it at room temperature where it isn't too hard and not melted. Bam! Dark spots covered.


Bon Appétit!

Love,
Soffy

Sunday, September 18, 2016

Apple Pie Bread Pudding

Helllo!

My sisters and I share the same past time; baking. The thing that I love most about baking is the amount of creativity that you can put into a recipe and we always share our newly found holy grail recipes in our whatsapp group.All of us are busy with our own things every day but we love the fact that the kitchen is still  our safe haven.

In all honesty, where I live now the kitchen is tiny and the lack of familiar tools frustrate me. For my birthday this year I asked for a new mixer because the old one is rusty. ( I CAN’T EVEN FIND THE PARTS BEING SOLD HERE!!). So off we went and I was happy with this new standing mixer that I bought while thinking of the amazing breads that I can make later. It was such an effing dismay that the mixer was a complete joke! The stand is literally a stand. The bowl doesn’t rotate or anything. I though the stand was faulty. NOPE. I feel like crying just thinking about it. Another thing that I miss having is a legit oven. The one that I have now is a microwave oven that can grill, bake and many other things. But there is nothing that can replace a normal oven. Did I mention that our kitchen is tiny? Tiny kitchen comes with tiny working space. Sigh. One day, when we move out maybe.


Having a small microwave oven and a simple mixer with very limited counter space, baking can be quite a challenge nowadays. So I tend to stick to fool-proof recipe that are easy to make, easy to clean and easy to play around with. Like this Apple Pie Bread Pudding  recipe. It is basically bread pudding with apple pie filling.


Apple Pie Bread Pudding 

Bread pudding layer

4 large eggs, beaten
3/4 granulated white sugar or ½ cup brown sugar
4 cups of milk
7-9 pieces of white bread
a dash of cinnamon and vanilla


1. Preheat the oven to 180 degree Celsius.
2. Mix the milk, beaten eggs, sugar cinnamon and vanilla in a big bowl
3. Cut the bread pieces into small cubes and soak them in the milk mixture.
4. Pour into an 8" x 8" baking dish and set aside.

Apple Pie filling

4 small apples
½ teaspoon of cinnamon
½ cup of sugar or less, depending on the sweetness of the apples.
3 tablespoon of flour

1. Peel, core an cut the apples into small cubes.
2. Mix the apples, cinnamon, sugar and flour together.
3. Spread  the apple pie filling onto the bread pudding mixture evenly.
4. Bake for about 20 mins to 30 mins.
5. Serve hot with a scoop of ice cream


It is so easy to make, in less than an hour, you can make it, bake it and eat it piping hot with a dollop of vanilla ice cream. The hot and cold sensations in your mouth bring this easy dessert to another level. We served this to our guests recently; and they were amazed by it.


Enjoy!


Love,
Soffy

Tuesday, September 6, 2016

Clam Soup

Hello!*blows cyber cobwebs off*

I haven’t blogged for so long! Because of that, there were quite a number of recipes that I forgot to write down and now I have no idea what I put in some of the glorious meals made before. Oh well. I obvs had to write down a couple of recipes that I would come back to.

Anyhoos, Jaya Grocer is fiiiiiinaly open near my office. Wandering through fancy supermarkets is one of my favorite pastimes. Walking through aisles and aisles of ingredients that came from numerous parts of the world! Sigh. I could rarely walk out empty handed! Recently I spotted packets of clams on sale! CLAMSSS!!!!!!!!Who could say no to clams? Just a week or so before I was dreaming of dunking garlic bread in a hot soupy seafood broth. Yass!It's a sign I tell you.

I came across Zuppa di Vongole recipe and I tweaked it a bit using the ingredients that I already had at home.

Clam Soup 
(Makes 2 portions)

400g  fresh clams
2 tablespoon of olive oil
3 cloves garlic, chopped
half teaspoon of chili powder
¾ cup bottled tomato sauce/pasta sauce
1 cup water
½ cube of anchovy cube
Salt,to taste
  
  1. Wash the clams and soak in water for about 30 minutes to get rid of the saltiness. Set aside
  2. In a pot, pour in the olive oil chopped garlic  and chili powder together. (The flavor will infuse better)
  3. Sauté the garlic on a medium heat for about 1 minute
  4. Add the tomato sauce, water and anchovy cube. Let simmer.
  5. Add the clams and close this lid of the pot. Cook for about 5 minutes or so until the clams open.
  6. Taste for seasoning. Add salt if needed.
  7. Serve while hot.


Please note that bottled tomato sauce and ketchup are two different things. I remember vividly the argument that my sister and I had. It is a sauce made from crushed tomatoes. No? Ketchup has vinegar etc in it right? So no. Please do not put ketchup in this soup. Bleargh. Please Pardon the picture, it was a weeknight dinner after all. Annnd, no. I did not get any artisan bread to dunk into the soup. Next time, maybe.


Bon Appétite!

Love,
Soffy